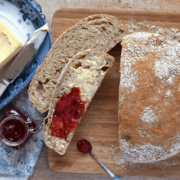
Good things come to those who wait as far as this no-knead loaf of bread is concerned. The bread is no-fuss to make and requires only a few short minutes of hands on time. The long prove results in a flavoursome well aerated loaf which is lovely served alongside a salad, as a traditional sandwich or simply toasted.

For many people, homemade bread is a real treat; a staple which is lovingly handmade filling the home with mouth watering aromas whilst it proves and bakes. Homemade bread is always tastier and more satisfying than that manufactured using the Chorleywood Bread process which significantly speeds up the whole method and in doing so removes so much of the bread flavour.
This No-Knead Bread recipe really gives bread what it requires for a great tasting loaf - time! And lots of it, though don't be put off by the length of time required to make this delicious well aerated loaf because the hands on time you need to give it is a mere 10 minutes from start to finish.

This bread recipe has become an absolutely winner for us because it requires no kneading. It's perfect for those who dislike the feel of dough against their hands or those who may lack confidence with the kneading process. It's also great for me given that I've now had to retire my traditional bread making activities because of pain and stresses in my wrist which is aggravated by the repetitive kneading process.
That is until now. Homemade bread is now back on the menu!

I
first came across No-Knead Bread when I watched Paul Hollywood's new TV series, City Bakes on
the Food Network channel. I sat transfixed as the bread baker at
Sullivan Street Bakery in New York, East Manhattan, created loaves
without any kneading! Seriously no kneading! And it wasn't even a soda
bread! I rewound the recording and watched again, making notes this
time of what the baker did. The baker, Jim, is by all accounts famous
in the bread world for coming up with this simple way of making good
bread at home. He even helpfully shared the quantities of the white loaf
he made with Paul Hollywood!
Our version of that recipe includes some wholemeal flour, which not only makes it a little healthier but also introduces even more flavour to the loaf. Unlike the original no-knead bread recipe, which is baked in a Dutch oven, our loaf is baked in a round cake tin and covered over with a couple of sheets of tinfoil.

This No-Knead Bread is literally that - it requires no kneading at all. Once the ingredients are weighed and mixed together (you can use a wooden spoon if you don't want dough over your hands), which takes no more than 5 minutes, the dough is covered and set aside to prove in a cool place to do its thing. Now
I must say here, that 'thing' takes at least 24 hours before it can be
shaped and baked! I know it sounds like an inordinate amount of time
but as the old saying goes, 'good things come to those who wait' and you will be rewarded with an amazing loaf of bread which is easy to make, perfect served with salad or a soup, made into a sandwich or simply toasted.

So here's how to make No Knead Bread!
No Knead Bread
Good things come to those who wait as far as this no-knead loaf is concerned. The bread is no-fuss to make and requires only a few short minutes of hands-on time. The long prove results in a flavoursome well-aerated loaf which is lovely served alongside a salad, as a traditional sandwich or simply toasted.
Print Recipe
Pin Recipe
Save Recipe
Ingredients
- 300 g Strong White Bread Flour
- 100 g Strong Wholemeal Bread Flour plus extra for dusting
- 8 g Salt
- ⅓ teaspoon Easy Bake Yeast
- 300 ml Lukewarm Water
- Butter for greasing
Instructions
- Mix the bread dough. Place the flours, salt and yeast in a good size bowl keeping the salt away from the yeast. Combine with your hand (or wooden spoon). Make a well in the flour. Pour in all of the water. With your hand mix the flour into the liquid aiming to make a dough. The dough will be fairly soft and sticky at this stage. Aim to ensure all of the flour has been incorporated.
- Prove. Cover the bowl, either with cling film or a large plate. Place the covered bowl somewhere cool (though not in a draft), to allow the dough to prove slowly. Consider proving the dough in the fridge. Allow to prove for about 24 hours or until doubled in size (though the time will depend upon the room’s temperature).
- Prepare to shape. Place a large baking tray or chopping / preparation board on the work surface. Lay the clean tea towel over it. Liberally dust the tea towel and top of the dough with flour. Without knocking back the dough, use a dough scraper or spatula to carefully scrape around the side of the bowl and tip the aerated dough onto the floured tea towel.
- Shape the dough. Carefully lift the left hand side of the dough and gently lay it so that the raw edge is running down the centre of the dough. Repeat with the right hand side of the dough, again laying it so that the raw edge is running down the centre of the dough and butting up to the left side. Imagine the oblong length of dough in thirds, gently lift the furthest edge and position it so that the centre third is covered. Carefully lift the edge nearest to you and lay it over the top. The dough will now be a fairly neat square.
- Prove again. Use the edges of the tea towel to gently but thoroughly cover the shaped dough. Set aside and allow to rest for a further 2 hours.
- Pre-heat the oven. Preheat the oven to 220℃ (200℃ Fan)/425°F/gas mark 8.
- Transfer to the cake tin. Completely grease the inside of the cake tin. Add a tablespoon of flour to the cake tin and rotate the tin around so that the greased sides and base are now fully coated in flour. Tip out any excess. Unwrap the rested dough and gently lift the dough into the cake tin. Alternatively, invert the cake tin over the dough ensuring that all of the dough is sat within the body of the tin. Lift the tray / board that the tea towel and bread dough is sat upon and in a swift motion flip it over so that the dough sits within the tin. If necessary gently shake the tin if it is slightly crinkled to one side. Cover the tin with a double strip of tin foil. (see notes below)
- Bake. Place the bread in the centre of the oven and bake for 20 minutes. Remove the tin foil from the tin. Rotate the tin and return the bread to the oven. Bake for a further 15 minutes. Carefully tip the bread out of the cake tin and tap the base of the bread. It should sound hollow. If not, place the bread directly onto the oven shelf and bake for a further 5 minutes, or until it sounds hollow.
- Cool. Place on a cooling rack.
- 10. Enjoy.
Notes
Specific Equipment:
1 x 20cm (8in) Round Cake Tin Tin Foil
1 x Clean Tea-Towel
Cook's Tips:
a) More flavour is created in the bread by slowly proving it.
b) The original recipe shows the bread baked in a Dutch oven, but I found using a quality cake tin covered with a double layer of tin foil worked as well. Feel free to try with a Dutch oven.
c) As the dough is so soft and delicate we found it easier to transfer the dough to the tin by inverting the cake tin over it although Jim (the bread baker in New York) successfully transferred the dough by lifting it.
Tried this recipe?Leave a comment or mention @OnlyCrumbsRemain or tag #OnlyCrumbsRemain!


Monte Thompson
Went from City Bakes rewind-notes-taking straight to Google and came up with this page. Woo hoo!
Becuase I'm a complete noob (never baked anything from scratch) and I only have gluten free self-raising flour in the cupboard, that's what I'm going to use. My cake tin is a bit wider too but what the heck - to never have tried is to already have failed as my saying goes. Maybe I'll get bigger air holes and a higher rise to fill up the extra space in the bigger tin. Either way, I'll let you know how it turns out!
Angela - Only Crumbs Remain
Way to go Monty for taking a leap into baking from scratch 🙂 though please bear in mind that you may not achieve quite the same results using a gluten free SR flour rather. Though I've got my fingers (& toes) crossed for you. Do let me know how you get on with it, especially as I've only ever tried it with a bread flour.
Angela
Evelyn
I tried this. Left for 24 hrs. Was so runny ran over the place. What did I do wrong? Prove too long or not enough. It did look as if it had been higher up the bowl but not sure. Any tips? Less water next time?
Angela - Only Crumbs Remain
Hi Evelyn, I'm sorry to hear that you've had a problem with the recipe. I've double checked the quantities for it and even compared them against the no-knead bread written about in a post by the New York Times (http://cooking.nytimes.com/recipes/11376-no-knead-bread) which lists the flour to water ratio as 3 cups of flour to 1 5/8th cup of water (when compared in grams this I believe is 360g flour and 390ml water) and therefore their recipe from Jim Lahey contains more water than the quantities I've listed (so therefore you shouldn't need to reduce the water quantity assuming you used 400g flour to 300ml water).
My instinct leads me to think that your dough had been over prooved and therefore deflated. I'm wondering if this then caused the runny nature of the dough. The dough itself does require a long proove, as you clearly gave it, but if the environment is too warm then the dough will develop faster than is desired. It's worth while trying to find a slightly cooler spot to let it do its thing more slowly, but I would suggest keeping an eye on it if you were to try the recipe again.
I'm in the process of re-testing the recipe and will let you know how I get on with it.
Angela
Angela - Only Crumbs Remain
Hi Daphne,
Thank you so much for the 'French' kneading tip. I've just googled it and and am definitely going to give it a try. It sounds very interesting and just what the doctor ordered, so to speak, if it causes no pain! I'm looking forward to trying the resultant bread and seeing how (if it does) differs to conventionally kneaded bread.
Co-incidentally, Paul H's New York episode of City Bakes was on TV again yesterday and having watched it again the second prove step after the shaping was only very briefly mentioned and glossed over. I'm so glad you questioned the apparent lack of a second prove and stumbled across Only Crumbs Remain. This bread dough is also quite wet but results in lovely air-pockets. I hope your bread turns out as well as ours did. We thoroughly enjoyed it and have made it many times since (and even made a delicious focaccia using the same process.) I'd love to hear how you get on with the no-knead bread Daphne.
Angela x
daphne payne
Hi Angela,
I'm going to give this no-knead a try as well. Like you I saw it on City bakes (very late on)but obviously missed the extra 2 hrs of proving - the bit I saw looked as if the dough was folded and put in the 'dutch oven' and then straight into the oven [ didn't think this could be right....] so have continued with having a go.
THEN I happened on your blog.....
I also suffer badly from Rheumatoid Arthritis in my wrists and hands (all over really) BUT I found that using the Richard Bertinet 'French' way of kneading causes me literally NO PAIN. I do make most of my breads with a high hydration and is also left over night to ferment[sometimes longer and sometimes in the fridge] so the dough is quite wet. Kneading the Bertinet way is very relaxing, makes me slow down; all the flip flopping of the dough can cause you to go into a hypnotic state...... Give it a try.
Corina
The structure of the bread looks perfect. I had absolutely no idea that it was possible to make bread this way without giving it a good knead! I do occasionally enjoy making bread and love the sense of satisfaction you get when eating your own bread, as well as the amazing baking smell! Thank you so much for joining in with #CookOnceEatTwice and sorry I'm a bit late visiting!
Angela - Only Crumbs Remain
I too had no idea either Corina, it was quite a revelation when I saw how good a loaf it made. You're right, it is immensely satisfying to make our own bread, the aroma alone is amazing.
You're welcome, thank you for hosting and there is nothing to apologise for at all Corina.
Angela x
Jenny
I have to say Angela that were is no way you can tell that this bread was not kneaded! It looks sooooo good!x
Angela - Only Crumbs Remain
Thank you Jenny 🙂 We were really pleased with it too, so flavoursome and light and yet it hadn't had the gluten worked by kneading it.
Thanks for your lovely comments Jenny,
Angela x
Jenny - Monkey and Mouse
This sounds so easy, despite some long waits, I might have to try. It definitely looks amazing! Sorry to hear about your wrists though. 🙁 Thanks for linking up to #HowtoSunday 🙂 x
Angela - Only Crumbs Remain
I totally agree Jenny, there are some long waiting for it...but as they say 'good things come to those who wait' 🙂 It makes up for it with the hands on time being negligible and have very yummy loaf at the end of it all. Do let me know how get on if you give it a whirl Jenny,
Thanks for hosting a great linky,
Angela x
Angela
Thanks so much for sharing this great recipe! Homemade bread is such a treat & I love that there is no kneading!! I plan meals 3 to 4 days in advance, so next time I make a homemade soup or stew, I will give this a try. Thanks so much for linking up with Sunday Fitness & Food. Have a lovely week!!
Angela - Only Crumbs Remain
Thank you Angela, I hope you enjoy it as much as we do 🙂 If you do try it do let me know how you get on with it,
Thanks for popping by and have a great weekend Angela,
Angela x
Charlotte Oates
I'm sorry to hear about your wrist, I find kneading bread so relaxing so I'd really miss doing it if I couldn't. Your no-knead version looks just perfect though and it would be brilliant to make with the boys as their kneading leaves a lot to be desired (for a start they don't like mucky hands!).
Angela - Only Crumbs Remain
It certainly is relaxing isn't it? I particularly like kneading enriched breads, they're so silky. I have my fingers crossed that I can get back into the kneading saddle in a few months after a long rest and being careful.
I made some bread with our godson a few years back when he was about 4, he certainly enjoyed getting his hands into the dough but the kneading wasn't happening even though I kneading a lump of dough at his side for him to copy. I ended up kneading his dough when he wasn't looking before it eventually was baked and given to his parents 😉 This no-knead sounds a great start for your sons after all they can even mix the dough with a wooden spoon. I'll look forward to seeing one of your videos starring your little ones 🙂
Thanks for popping by and commenting Charlotte,
Angela x
Sarah James
Your bread looks delicious Angela. I love the idea of a no knead bread, I have a neck problem & kneading dough really sets it off. I use my stand mixer with good results but reckon I might try this method. Thanks for sharing & I hope your wrist continues to improve with rest xx
Angela - Only Crumbs Remain
Aw thank you Sarah, do try it when you get chance it's amazing how well it works.
It's such a shame our bodies can't hold up to doing the things we love isn't it, but at least there are ways around it. I have my fingers crossed it'll heal too, we've bought a wrist support to hopefully give it more chance of making a good recovery.
Thanks for popping by and your lovely comments Sarah,
Angela x
Sarah Montgomery
Now this sounds like my kind of bread! You know, this would make a great entry for the #CreditCrunchMunch link up, as you could batch make this and keep in the freezer. Just sayin! Hehe. 🙂
Angela - Only Crumbs Remain
It's rapidly turning into our kind of bread too Sarah. I do enjoy kneading, but it's not agreeing with me, but this bread is so tasty that I'm more than happy to be making it.
Ooh, that's a good idea, I'll pop over,
Thanks for popping by and commenting,
Angela x
Sarah Montgomery
Yes, I understand. I get terrible RSI from time to time in my hands and wrists and find it hard to even type! There are some good exercises that help it but still takes time for it to ease. I hope you feel better soon. 🙂 Thanks for entering #CreditCrunchMunch btw. 🙂
Angela - Only Crumbs Remain
Thank you Sarah, I've got a wrist support now but some wrist exercises sound a very good idea, I'll have a tentative look on the web.
Angela x
Kirsty Hijacked By Twins
This break looks lovely. I like the idea of no knead but sometimes I do find kneading to be so therapeutic! Thank you for sharing with #CookBlogShare x
Angela - Only Crumbs Remain
I totally agree Kirsty kneading is certainly therapeutic. But when is great when we don't have time for kneading or if our poor body doesn't hold up to the task.
Thanks for your lovely comments Kirsty,
Angela x
Lucy Allen
This bread looks amazing for no-knead bread! I've seen it on Pinterest for the last couple of years but haven't tried it yet. I bet it would work in a slow cooker too!! Glad you've found away to still make bread despite your wrist. Thanks for linking up with #BreadySteadyGo!
Angela - Only Crumbs Remain
Thank you Lucy 🙂 I was vaguely aware of no-knead but had half forgotten about it. So when I watched the City Bakes programme my ears really pricked up. The loaves they made in that New York bakery looked amazing and certainly doable. Never having used a slow cooker I wouldn't be able to say if it works or not. If you try it in one do let me know how it goes.
Thanks for your kind words Lucy and of course for hosting,
Angela x
Eb Gargano
Love the sound of this bread - how clever! Sorry to hear about your wrist - how frustrating for a keen baker like yourself! This sounds such a clever way round the problem, though, and sounds like it tastes as good if not better than normal kneaded bread. Now I know why you wanted to know about dutch ovens 🙂 Really need to try making bread in mine - is there no end to the brilliance of the cast iron pot?!? You really must get yourself one, Angela 😉 Eb x
Angela - Only Crumbs Remain
Thank you Eb 🙂 Though the cleverness is really courtesy of Jim over in New York 😉 It really is delicious both as a sandwich and toasted...the butter melts into those generous air pockets beautifully when slices are toasted, a big yum. It is frustrating especially as it's not been right for a number of months now - if I'm careful what position I pop it into then I can get through the day without pain (hurrah). So far it's only directly affecting my bread making but it did flare up when I had my first clay throwing class a couple of weeks ago - having spoken to the teacher I can work around that (thankfully as I'm loving learning to throw).
Yes, those cast iron pots are gorgeous with such a range of fab colours. My brother got one a few months back and swears by it but I think I'd have to get Mr E to lift it around for me especially when full due to the silly wrist issue! You'll definately have to give your pot a go with bread Eb.
Thanks for popping by Eb and your lovely comment,
Angela x
Eb Gargano
Ah yes - you are right about the weight of the cast iron pot - they are heavy and with a dodgy wrist that might not be such a good idea. Shame as they are lovely 🙂 Oooh exciting to hear about your new found love of clay. I have also started a new hobby - I've just joined a joggers beginners class - I need to run off all the easy peasy meals I keep making!!! Eb x
Angela - Only Crumbs Remain
Hahaha, I think me & I out to join a jogging club too with all of our bakes...though we have some very good neighbours, work colleagues and of course family who are more than willing to share the bake with us 🙂
Angela x
Sarah Trivuncic
BTW even Paul Hollywood said on Graham Norton last week that he got carpal tunnel syndrome from kneading bread so had to stop! Sounds like a reason for investing in a KitchenAid!!
Angela - Only Crumbs Remain
Ooh I missed the Graham Norton show - certainly interesting that the bread man himself has had to stop knead. Carpel tunnel syndrome is such a painful condition too - my mum was diagnosed with it a few yrs back.... hahaha a KitchenAid does sound like a very good idea 😉
Thank you for your lovely comments Sarah, and of course for hosting,
Angela x
Sarah Trivuncic
I don't like kneading bread so this is right up my street! Looks fab 🙂 Thanks for joining in with #BAKEoftheWEEK !
Cal at Family Makes
Looks absolutely delicious, and sounds easy enough to make too. Thanks for sharing #HowToSunday . ps can you tll me how you got the badges at the bottom of your page to appear so small please? My 'How To Sunday' badge came up huge!
Angela - Only Crumbs Remain
Thank you Cal, it's so easy as far as bread making is concerned - and certainly worth the wait in our book 🙂
Hahaha, it took me a little while to work that one out too. I write my blog on blogger, but I'm sure it'll be similar on other platforms. Once I've pasted the badge's HTML code into the post's HTML section I then go back into the 'compose' section (where I write the body of the post) and right click on the image. This brings up a box and allows me to select the size I want (small, med, large etc.) Clicking small still gives a relatively large badge, so once a 'size' is selected I go back into the post's HTML and locate the code for the badge. The code will have slightly changed as it will include code for size. I then look for the height="200" and width="200" and alter both values to 100.
Hope this makes some sense and helps, if not give me a yell Cal and I'll try to help further.
Thanks for popping by,
Angela x
myrealfairy.com
Another great recipe that I've seen today and the two go together so well! I love the thought of giving this a go. Your pictures really do do it justice, it looks scrummy!:)
mainy - myrealfairy
#HowtoSunday
Angela - Only Crumbs Remain
Aw thank you Mainy 🙂 I'd love to hear how you get on with it if you give it a try. we've really enjoyed the loaf and are planning to start another loaf tomorrow morning.
Thanks for popping by and your kind comments,
Angela x